Have you ever wondered how developers create apps? Flutter, Ionic, React Native, Kotlin, and Swift are tools that allow us to do this. Some will enable you to code once and have an app for iOS and Android, while others are platform-specific.
Flutter is a newer framework that shows a lot of promise, and it is OGK’s framework of choice for mobile development. Using Dart, Flutter provides native performance and fast development. Why is this important? Having one code-base for a fast running app can create a better user experience. Using Swift and Kotlin, you are developing two apps that must mimic each other for each platform.
We can already see Fortune 500 companies like Capital One, eBay, and Google utilizing Flutter for their mobile apps. While the community is smaller compared to other frameworks and languages, it is steadily growing!
A Quick Flutter Tutorial – My First Project
Are you still wondering, “how do I build an app?”. Let’s start by installing the Dart and Flutter SDK. We have the option to do this on Windows, macOS, Linux, and Chrome OS. To write code, we need an IDE or editor. My suggestion is to start with Visual Studio Code. Within Visual Studio Code, install some extensions to assist development:
Depending on your operating system and whether you want to build for Android or iOS, you will need to install Xcode and Android Studio. Xcode will give you access to compiling for iOS and is limited to macOS systems, and Android Studio will give you access to compiling for Android. Xcode and Android Studio both provide emulators to test your app directly on your computer.
Next, create a folder for your project. It can be on your Desktop, if that’s easiest for you. Once created, open it within Visual Studio Code. Having some knowledge of Terminal/Command Prompt/Console will help you through the process. Within Visual Studio Code, we will open Terminal or a terminal equivalent. If you correctly installed Flutter, you will be able to use the flutter command. Type “flutter create app_name” as shown below:
$ flutter create app_name
You will then see a lot of files created within your project folder. Once complete, you have your first flutter project created–queue the confetti! What you made is a counter app. While this may seem useless at first, it allows us to study an elementary level of app structure.
Within the project folder, you will see some new files and folders. The two we will focus on are the “lib” folder and the “pubspec.yaml” file. The “lib” folder is where most of your code will live. “Pubspec.yaml” is a file that manages packages, assets, fonts, and more. Going back to the “lib” folder, you will find a “main.dart” file. As I mentioned earlier, Dart is the primary language used with Flutter, and it has some similarities to Java’s syntax for creating functions, variables, and classes.
Everything is a Widget
“Everything is a widget” is a common phrase you’ll hear about Flutter. Within the “main.dart” file, we can see a main function, a stateless widget, and a stateful widget. The main function is what gets the app running, using “runApp().” A stateless widget, like MyApp, is typically used when the information within the widget will not need to update. A stateful widget, like MyHomePage, can be used when you know an object will eventually change and will update on the screen.
Defining functions within widgets
Within stateful and stateless widgets, we can define functions. These functions can run when the app or a screen loads, when the user swipes, presses a button, and more. Along with that, you will see stateful and stateless widgets within each other. There are many different types of widgets you can use in a Flutter app! Widget Catalog gives examples of ready to use widgets for Flutter. Going back to your “pubspec.yaml” file, you can expand on the available widgets by adding new packages!
Flutter layout widgets
Layout Widgets allow us to define where widgets display on the screen and their sizes. Commonly used widgets are Container, Row, Column, Grid, Listview, and Stack. A Scaffold allows us to display drawers, snack bars, and bottom sheets. These are standard widgets we see within apps when opening a side menu, uploading a photo or video, or using a date picker.
There are widgets for just about anything you need. Whether it’s a button, an input field, displaying text, displaying an image, or displaying a list. Does what you need not exist? You can combine widgets to create an entirely new experience. Like I said, “everything is a widget!”
In the starter app we created, we can see a few widgets that makeup what we see on the phone. Scaffold, Column, Text, and FloatingActionButton organize the app, display information, and allow us to execute actions.
States Management: Sharing and Updating Information
A variable is a way we store information. Some variables can be updated while others cannot. Within the _MyHomePageState class in our app, we can see an int _counter variable. The int in front of the variable name means that it will hold only integer values (between -2^53 and 2^53). When starting the app, the variable has a value of 0.
The function _incrementCounter takes the _counter variable and adds 1 to its value on each run. What is important to note within this function is the setState function wrapped around the _counter variable. Using setState around the _counter variable rebuilds the widget displaying the variable when running the function. The rebuild now will display the updated value of _counter in the app. Without setState, the variable itself would still increment, but nothing would appear different on display.
State management in our counter app is a very base level version and is one of many ways to manage a state. In Flutter, you can use Bloc, Provider, InheritedWidget, Redux, Riverpod, and more to manage states. As apps grow, we use state management to maintain login status, retrieve, upload, and update data and determine when to display one screen over another, so states are very important to learn and understand.
Running Our First Flutter App
Now that we have a basic understanding of a Flutter app’s structure, we can test ours out! In Visual Studio, you will want to open the Terminal within your project. Here, we can type:
$ flutter pub get
which will begin to include any packages or assets added in your “pubspec.yaml” file.
Doing this expands your app’s capabilities and features. Now we can click on “Run” at the top navigation bar and then “Run Without Debugging.” You should see a prompt display asking you to select a device to use. Depending on your system, you may have options to use an iOS simulator, Android, or even your phone’s physical device if connected. Since we are using macOS, we will run our first app with the iOS Simulator.
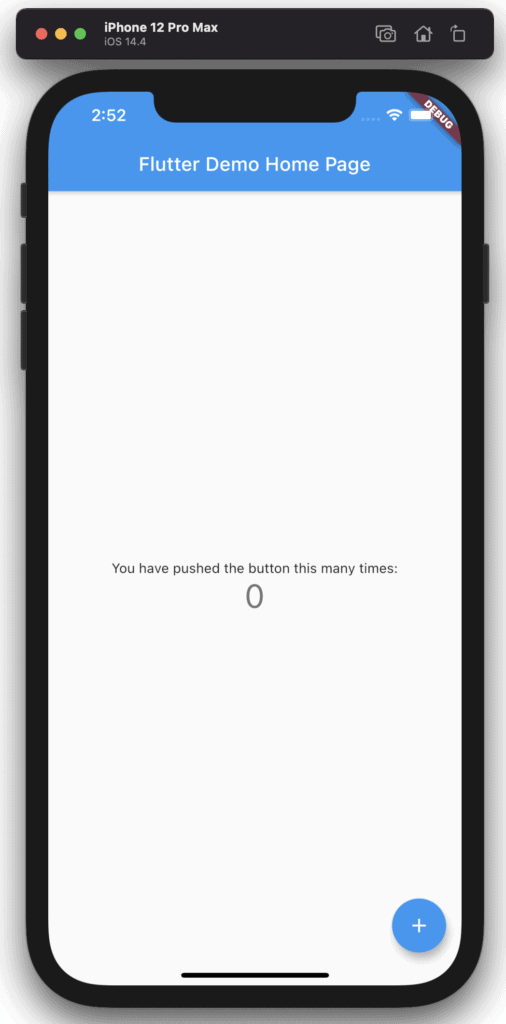
After waiting a few minutes for the emulator to boot and our project to build, our app should display! We should see some header text, an app bar, some text in the center, and a button at the bottom right in the emulator.

Another nice feature included with Flutter is hot reload. Hot reload allows the running emulator to update the app in real-time as we code. This is super useful because you can see changes as you make them, and test out different parameters more efficiently!
What Do I Do Now?
You may be wondering where to go from here. That is entirely up to you! Flutter is continually evolving as developers add more features and packages. The first question you should ask yourself is, “what kind of app do I want to make?” There are plenty of resources online, from Flutter’s documentation to StackOverflow and Medium. If you are more of a visual learner, Youtube and Udemy also have an extensive catalog of content focusing on Flutter.
My last piece of advice is to keep a list of features you want to include, and always maintain a document that has the big picture idea of the project. Try to think about how your desired features would interact with each other or even interfere. Does your app need to store data? Does this data need to be user-specific? Where does this data live? How is it structured? What kind of states do you need to store and keep track of? I’ll leave you with these questions that will help you get started. Having a clear picture of your end goal is important, even though you’re bound to add and remove features throughout the project. Laying the foundation is the first step, though. Once you do that, you’ll be well on your way!
